Wednesday, March 13, 2013

Wireless humidity & temp. sensor

Some times there is a need to measure temperature and humidity in a place where you can't put wires. The best way to resolve this problem is to put a wireless sensor. You can make one by yourself, but it will require a lot of work: making the pcb, find a good isolated enclosure(in case it rains). Ok, maybe one device will not be so complicated to make, but if you need few of them it can take a lot of time. So i decided to take a commercial one and to hack it. Of course there are some base station for that remote sensors, but they don't do smart think and you can't connect them to the internet :).

There are a lot of companies that produce wireless humidity and temperature sensors. This is my choice :


And back side:


Here you can see the pcb:
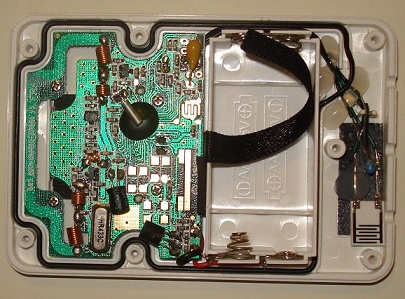


And one more picture:


This sensor sends humidity and temperature over 433Mhz radio frequency every minute. Also it has a lcd to display the data.  The precision of temperature is 0.1 degree, pretty good. The device can be forced to send data by pressing the TX button on the back. On the back there is a switch to select Celsius or Fahrenheit to be displayed.

In order to decode the signal we need a 433Mhz radio receiver. I plugged the receiver to mic input on a sound card(unfortunately i don't have a digital oscilloscope). And to register the signal i used sound forge.

It looks like the sensor sends the same frame 32 times. Every frame lasts for around 52 ms and the pause between frames is around 8ms. So, all 32 frames are sent in 1920ms(it's a big window). Here is how looks one frame:


As you can see there are only two patterns. In both of them the timing when the signal is high is the same. That means, that only variation in the timing, when signal is low, says when we have logical "1" or logical "0". So i made the following assumption:


I made a table that shows the received code and the actual temperature(displayed on lcd):

Received code Temperature (°C) Humidity (%) Battery status
0100_1011_0001_0000_0011_0100_0000_1100_0000 19,2 52 -
1100_1010_1001_0000_0010_0110_0000_1111_0010 24,2 38 low
0110_0110_1001_0000_0010_1000_0001_0000_0000 25,6 40 low
1001_1100_0001_0000_0010_1000_0001_0000_0010 25,8 40 -
1010_1000_0001_0000_0010_0000_0001_0001_0001 27,3 32 -


After some thinking a have got this( for 24,2°C, 38% ):


So the sensor sends 36 bits, that means:
  • address  -  first 8 bits are changed on every power up of the sensor. 
  • battery  -  when the battery is low,  this bit is set to '1'.In this case a battery is displayed on the LCD screen.
  • unknown data  -  this 8 bits remains always the same, so i couldn't track them.
  • humidity  -  is the binary representation of the humidity. So dec(38) = bin(0100110).
  • temperature  -  is the binary representation of the temperature multiplied by 10(or just remove comma from the temperature). That means: dec(242) = bin(000011110010).
The only problem with this sensor is that the address is changed on every power up. That means, that i have to reassign the sensor in my system every time i change the batteries, which happens every 10 months.

Tuesday, March 12, 2013

Wireless temperature sensor

Some times there is a need to measure temperature in a place where you can't put wires. The best way to resolve this problem is to put a wireless sensor. You can make one by yourself, but it will require a lot of work: making the pcb, find a good isolated enclosure(in case it rains). Ok, maybe one device will not be so complicated to make, but if you need few of them it can take a lot of time. So i decided to take a commercial one and to hack it. Of course there are some base station for that remote sensors, but they don't do smart think and you can't connect them to the internet :).

There are a lot of companies that produce wireless temperature sensor. This is my choice :


And back side:


Here you can see the pcb:


And one more picture:


This sensor sends temperature over 433Mhz radio frequency every minute. The precision is 0.1 degree, pretty good. The device can be forced to send data by pressing the TX button on the back.

In order to decode the signal we need a 433Mhz radio receiver. I plugged the receiver to mic input on a sound card(unfortunately i don;t have a digital oscilloscope). And to register the signal i used sound forge.

It looks like the sensor sends the same frame 10 times. Every frame lasts for around 82 ms and the pause between frames is around 8ms. So, all 10 frames are sent in 900ms. Here is how looks one frame:


As you can see there are only two patterns. In both of them the timing when the signal is high is the same. That means, that only variation in the timing, when signal is low, says when we have logical "1" or logical "0". So i made the following assumption(which turned to be right):


To figure out how the data is coded i used the original base station(that shows me the actual temperature send by the sensor). This are the results:

Received code Temperature (°C)
1110_0100_0001_0100_1000_0000 20
1110_0100_0001_0101_1000_0001 21.1
1110_0100_0001_1010_1100_0000 24
1110_0100_0001_1001_1100_0001 25.1
1110_0100_0001_1001_1100_0100 25.4

So the sensor sends 24 bits. The only thing left is to 


Sunday, September 9, 2012

Samba

To install samba type command:
         sudo apt-get install samba samba-common-bin

Create a folder you want to share:
        sudo mkdir /remote_disk

To change the owner of the directory(in this case set owner and the group to be pi):
       sudo chown pi:pi /remote_disk

Add following lines in  /etc/samba/smb.conf to share /remote_disk folder
[public]
        comment = remote disk
        path = /remote_disk
        browsable = yes
        guest ok = yes
        read only = no
        create mask = 0755

To enable security(ask username and password on connect) you have to open /etc/samba/smb.conf file, and uncomment line(delete the '#'):
       # security = user

To restart samba type command:
      sudo /etc/init.d/samba restart


Tuesday, July 3, 2012

Running program at startup


In order to run a program at startup you have to put next line in /etc/rc.local:
            test_program > /dev/null 2>&1 &
where
  • test_program - is the name of the program we want to run at startup
  • > /dev/null - redirects all standard output from the test_program program in /dev/null (black hole). It means all data are dropped.
  • 2>&1 all standard errors are redirected in standard output. Or we could write this line as: 2>/dev/null which will redirect standart errors directly to black hole.
  • & - puts our program in background.

If you want to log all data that are printed by your program do this:
           test_program > log_file &

If you want to stop your program, that is running in background, type this command:
             killall -9 test_program

Thursday, June 14, 2012

Remote speakers

Almost all of my music is saved on my computer. So, i have to connect my boxes to my computer. I use a laptop with Wi-Fi connection in my bed and it's uncomfortable every time to plug audio jack. After some googling i found a few solutions. Or maybe one solution with different implementations.

The main idea is to "plug speakers" into my home network. The simplest implementation is to use another computer, which is connected to a router via Ethernet and the speakers are connected to that computer. The main disadvantage is the power consumption. The second is that you have to buy a new computer, which can cost a lot. But the advantage is that you can use it also as an external hard drive(like NAS), so 2 things in one machine. The software: i used VLC player(best solution). You can install VLC on a Windows, Linux or MAC. I tried on first two and it works. You can setup your playlist.You can even add online radio stations in your playlist. VLC configurations:
  • open VLC, then select Tools > Preferences. In the bottom left corner of the window, under "Show settings", click "All". Than go to Interface > Main interfaces and check the Web radio button.
  • than in main VLC window select view > Add interface > Web. 
  • edit file C:/Program Files/VLC/lua/http (for VLC 2.0.1), uncomment the line with your network (in my case it was: 192.168.0.0/16).
Or you can make all of above setting from command line typing :
         "C:\Program Files\VideoLAN\VLC\vlc.exe" --extraintf http --intf wx
This is useful when you want to start-up VLC on Windows start-up. Now open your browser and type  http://192.168.0.186:8080, this will open VLC web interface. very simpe :).

The grate thing here is that you can use your smart phone to control that remote VLC. I tried this on my phone which runs android 2.3.3, and my ipod touch 4g. It works on both devices. You just have to install VLC remote(i also tried VLC iRemote) , and you good to go. 
     
I also tried connecting my computer to a TV(over VGA). You can pause play change the volume remotely.

For low power solution you can use for example Raspberry Pi or Beagle Bone. In case the VLC isn't working on that devices you have to make your own program .